Keystone基本概念介绍
User
User即用户,他们代表可以通过keystone进行访问的人或程序。Users通过认证信息(credentials,如密码、API Keys等)进行验证。
Tenant
Tenant即租户,它是各个服务中的一些可以访问的资源集合。例如,在Nova中一个tenant可以是一些机器,在Swift和Glance中一个tenant可以是一些镜像存储,在Quantum中一个tenant可以是一些网络资源。Users默认的总是绑定到某些tenant上。
Role
Role即角色,Roles代表一组用户可以访问的资源权限,例如Nova中的虚拟机、Glance中的镜像。Users可以被添加到任意一个全局的 或 租户内的角色中。在全局的role中,用户的role权限作用于所有的租户,即可以对所有的租户执行role规定的权限;在租户内的role中,用户仅能在当前租户内执行role规定的权限。
Service
Service即服务,如Nova、Glance、Swift。根据前三个概念(User,Tenant和Role)一个服务可以确认当前用户是否具有访问其资源的权限。但是当一个user尝试着访问其租户内的service时,他必须知道这个service是否存在以及如何访问这个service,这里通常使用一些不同的名称表示不同的服务。在上文中谈到的Role,实际上也是可以绑定到某个service的。例如,当swift需要一个管理员权限的访问进行对象创建时,对于相同的role我们并不一定也需要对nova进行管理员权限的访问。为了实现这个目标,我们应该创建两个独立的管理员role,一个绑定到swift,另一个绑定到nova,从而实现对swift进行管理员权限访问不会影响到Nova或其他服务。
Endpoint
Endpoint,翻译为“端点”,我们可以理解它是一个服务暴露出来的访问点,如果需要访问一个服务,则必须知道他的endpoint。因此,在keystone中包含一个endpoint模板(endpoint template,在安装keystone的时候我们可以在conf文件夹下看到这个文件),这个模板提供了所有存在的服务endpoints信息。一个endpoint template包含一个URLs列表,列表中的每个URL都对应一个服务实例的访问地址,并且具有public、private和admin这三种权限。public url可以被全局访问(如http://compute.example.com),private url只能被局域网访问(如http://compute.example.local),admin url被从常规的访问中分离。
keystone 的访问流程
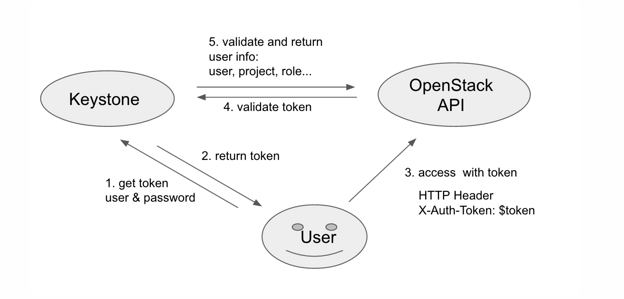
通俗的讲,token 是用户的一种凭证,需拿正确的用户名/密码向 Keystone 申请才能得到。如果用户每次都采用用户名/密码访问 OpenStack API,容易泄露用户信息,带来安全隐患。所以 OpenStack 要求用户访问其 API 前,必须先获取 token,然后用 token 作为用户凭据访问 OpenStack API。
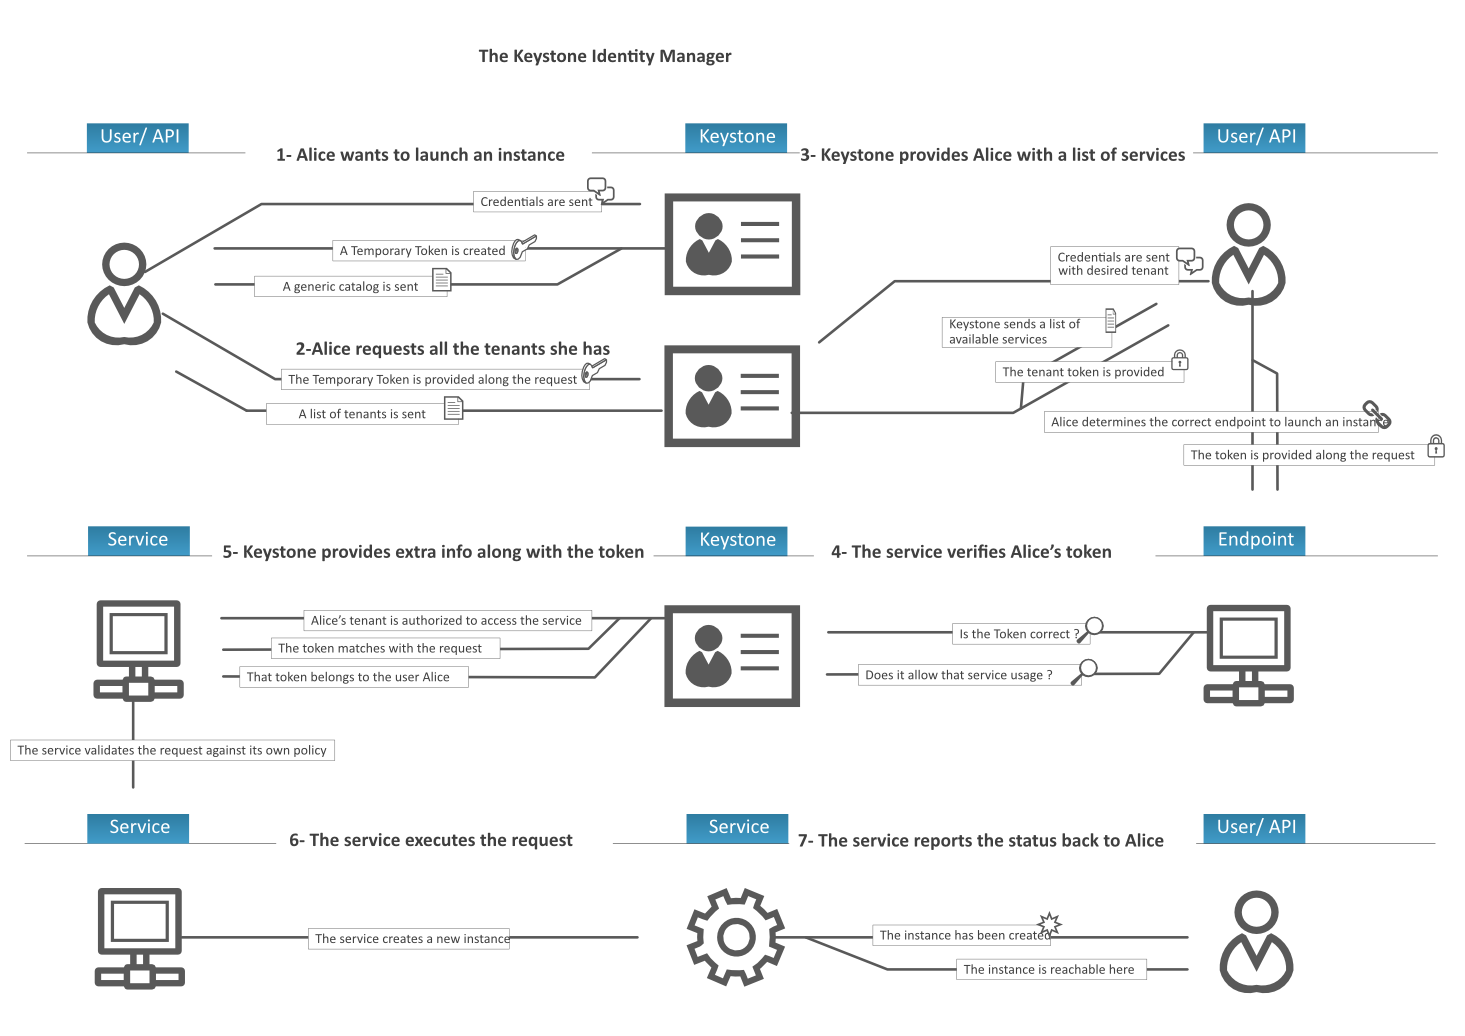
以创建一个虚拟机(server)为例,结合下图简述下keystone在openstack的访问流程。
-
用户Alice通过自己的户名和密码向keystone申请token,keystone认证用户名和密码后,返回token1
-
Alice通过token1发送keystone查询他所拥有的租户,keystone验证token1成功后,返回Alice的所有Tenant
- Alice选择一个租户,通过用户名和密码申请token,keystone认证用户名、密码、tenant后,返回token2。(其实1、2步仅仅是为了查询tenant,如果已经知道tenant,可以忽略1、2步)
- Alice通过token2发送创建server的请求,keystone验证token2(包括该token是否有效,是否有权限创建虚拟机等)成功后,然后再把请求下发到nova,最终创建虚拟机
1.获取临时Token
我们知道要创建虚拟机,一定是某一租户下的用户来创建的,因此在创建之前用户要获取自己所能访问到的租户 (一个用户可以属于多个租户),要想获取用户能访问的所有租户需要从keystone获取一个不与任何租户相关联的临时Token. 我们可以使用keystone的标准REST API获取某一用户能访问的所有租户,注意这里不要在请求体中设置租户名。
1
2
3
4
5
6
7
8
9
10
11
12
13
14
15
16
17
18
19
20
21
22
23
24
25
26
27
28
29
30
31
32
33
34
35
36
37
38
39
40
41
42
43
44
45
46
47
48
49
50
51
52
53
54
55
示例请求:
POST  http://192.168.56.2:5000/v2.0/tokens
{

      "auth": {

        "passwordCredentials": {

            "username": "demo",

            "password": "rootroot"

         }

    }

}
示例响应:
  {
       "access":
       {
           "token":
           {
               "issued_at": "2015-01-04T14:23:33.501946",
               "expires": "2015-01-04T15:23:33Z",
               "id": "a19bc13b46ba459cb3104fa97e414a27",
               "audit_ids":
               [
                   "KA6wWhLFQWGMRpoCv1VYpQ"
               ]
           },
           "serviceCatalog":
           [
           ],
           "user":
           {
               "username": "demo",
               "roles_links":
               [
               ],
               "id": "f8b9c7807d95484fa829cdb68b410e77",
               "roles":
               [
               ],
               "name": "demo"
           },
           "metadata":
           {
               "is_admin": 0,
               "roles":
               [
               ]
           }
       }
    }
其中,响应中的access/token/id的值就是获取的临时Token,在接下来的请求中,将这个临时Token作为 X-Auth-Token的值(其中X-Auth-Token位于请求头部)
2.获取用户能访问的所有租户
我们使用上一步获取的临时token(a19bc13b46ba459cb3104fa97e414a27),来获取用户demo所能访问的租户,用户所能访问的租户由用户在租户中是否有角色来决定。使用下面api获取是所能访问的租户时,需要将临时token作为X-Auth-Token的值,如下所示。
1
2
3
4
5
6
7
8
9
10
11
12
13
14
15
16
17
18
19
20
21
22
23
24
GET http://192.168.56.2:5000/v2.0/tenants
HEADERS["X-Auth-Token":"a19bc13b46ba459cb3104fa97e414a27"]
 {
       "tenants_links":
       [
       ],
       "tenants":
       [
           {
               "description": null,
               "enabled": true,
               "id": "0e877c09c1924963800c7534bc03106e",
               "parent_id": null,
               "name": "demo"
           },
           {
               "description": null,
               "enabled": true,
               "id": "2b6f4d3001e841e9924c8278a8a745db",
               "parent_id": null,
               "name": "invisible_to_admin"
           }
       ]
 }
3.获取指定租户的Token
上一步中我们获取的用户所能访问到租户,接着用户需要从中选择一个租户,作为自己的工作空间, 用户在某一租户中才能访问其他非keystone服务,也只能使用指定租户的Token才能访问其他非keystone服务。 获取指定租户的Token,所使用的REST API与步骤1相同,仅有的区别:在body体中要指定租户。
1
2
3
4
5
6
7
8
9
10
11
12
13
14
15
16
17
18
19
20
21
22
23
24
25
26
27
28
29
30
31
32
33
34
35
36
37
38
39
40
41
42
43
44
45
46
47
48
49
50
51
52
53
54
55
56
57
58
59
60
61
62
63
64
65
66
67
68
69
70
71
72
73
74
75
76
77
78
79
80
81
82
83
84
85
86
87
88
89
90
91
92
93
94
95
96
97
98
99
100
101
102
103
104
105
106
107
108
109
110
111
112
113
114
115
116
117
118
119
120
121
122
123
124
125
126
127
128
129
130
131
132
133
134
135
136
137
138
139
140
141
142
143
144
145
146
147
148
149
150
151
152
153
154
155
156
157
158
159
160
161
162
163
164
165
166
167
168
169
170
171
172
173
174
175
176
177
178
179
180
181
182
183
184
185
186
187
188
189
190
191
192
193
194
195
196
197
198
199
200
201
202
203
204
205
206
207
208
209
210
211
212
213
214
215
216
217
218
219
220
221
222
223
224
225
226
227
228
229
230
231
232
示例请求:
POST  http://192.168.56.2:5000/v2.0/tokens
 {
   "auth":{
      "tenantName":"demo",
      "passwordCredentials":{
         "username":"demo",
         "password":"rootroot"
      }
   }
}
示例响应:
 {
       "access":
       {
           "token":
           {
               "issued_at": "2015-01-04T14:30:42.669320",
               "expires": "2015-01-04T15:30:42Z",
               "id": "f84bd18554bd4e49b147293ccbabdae2",
               "tenant":
               {
                   "description": null,
                   "enabled": true,
                   "id": "0e877c09c1924963800c7534bc03106e",
                   "parent_id": null,
                   "name": "demo"
               },
               "audit_ids":
               [
                   "DnJZAdncS7KX-N5M02Q-Ew"
               ]
           },
           "serviceCatalog":
           [
               {
                   "endpoints":
                   [
                       {
                           "adminURL": "http://192.168.56.2:8774/v2/0e877c09c1924963800c7534bc03106e",
                           "region": "RegionOne",
                           "internalURL": "http://192.168.56.2:8774/v2/0e877c09c1924963800c7534bc03106e",
                           "id": "470f1cc24a1544d388b5f8312cb5e512",
                           "publicURL": "http://192.168.56.2:8774/v2/0e877c09c1924963800c7534bc03106e"
                       }
                   ],
                   "endpoints_links":
                   [
                   ],
                   "type": "compute",
                   "name": "nova"
               },
               {
                   "endpoints":
                   [
                       {
                           "adminURL": "http://192.168.56.2:9696/",
                           "region": "RegionOne",
                           "internalURL": "http://192.168.56.2:9696/",
                           "id": "36c9fd04cda04a3f8e30771549343052",
                           "publicURL": "http://192.168.56.2:9696/"
                       }
                   ],
                   "endpoints_links":
                   [
                   ],
                   "type": "network",
                   "name": "neutron"
               },
               {
                   "endpoints":
                   [
                       {
                           "adminURL": "http://192.168.56.2:8776/v2/0e877c09c1924963800c7534bc03106e",
                           "region": "RegionOne",
                           "internalURL": "http://192.168.56.2:8776/v2/0e877c09c1924963800c7534bc03106e",
                           "id": "48a15d71e8af4370b145b9db7d3f197c",
                           "publicURL": "http://192.168.56.2:8776/v2/0e877c09c1924963800c7534bc03106e"
                       }
                   ],
                   "endpoints_links":
                   [
                   ],
                   "type": "volumev2",
                   "name": "cinderv2"
               },
               {
                   "endpoints":
                   [
                       {
                           "adminURL": "http://192.168.56.2:3333",
                           "region": "RegionOne",
                           "internalURL": "http://192.168.56.2:3333",
                           "id": "ae6067b19be947f3a21d7b1e5f141353",
                           "publicURL": "http://192.168.56.2:3333"
                       }
                   ],
                   "endpoints_links":
                   [
                   ],
                   "type": "s3",
                   "name": "s3"
               },
               {
                   "endpoints":
                   [
                       {
                           "adminURL": "http://192.168.56.2:9292",
                           "region": "RegionOne",
                           "internalURL": "http://192.168.56.2:9292",
                           "id": "280059b3597b4274b36b16ecea4b8fff",
                           "publicURL": "http://192.168.56.2:9292"
                       }
                   ],
                   "endpoints_links":
                   [
                   ],
                   "type": "image",
                   "name": "glance"
               },
               {
                   "endpoints":
                   [
                       {
                           "adminURL": "http://192.168.56.2:8776/v1/0e877c09c1924963800c7534bc03106e",
                           "region": "RegionOne",
                           "internalURL": "http://192.168.56.2:8776/v1/0e877c09c1924963800c7534bc03106e",
                           "id": "0bd31fcde6fe4272b11cd97c79ff4d17",
                           "publicURL": "http://192.168.56.2:8776/v1/0e877c09c1924963800c7534bc03106e"
                       }
                   ],
                   "endpoints_links":
                   [
                   ],
                   "type": "volume",
                   "name": "cinder"
               },
               {
                   "endpoints":
                   [
                       {
                           "adminURL": "http://192.168.56.2:8773/services/Admin",
                           "region": "RegionOne",
                           "internalURL": "http://192.168.56.2:8773/services/Cloud",
                           "id": "02fe3abc06f1492089ef100f63299631",
                           "publicURL": "http://192.168.56.2:8773/services/Cloud"
                       }
                   ],
                   "endpoints_links":
                   [
                   ],
                   "type": "ec2",
                   "name": "ec2"
               },
               {
                   "endpoints":
                   [
                       {
                           "adminURL": "http://192.168.56.2:8774/v2.1/0e877c09c1924963800c7534bc03106e",
                           "region": "RegionOne",
                           "internalURL": "http://192.168.56.2:8774/v2.1/0e877c09c1924963800c7534bc03106e",
                           "id": "86ead91555a44de285f94957c05200ac",
                           "publicURL": "http://192.168.56.2:8774/v2.1/0e877c09c1924963800c7534bc03106e"
                       }
                   ],
                   "endpoints_links":
                   [
                   ],
                   "type": "computev21",
                   "name": "novav21"
               },
               {
                   "endpoints":
                   [
                       {
                           "adminURL": "http://192.168.56.2:35357/v2.0",
                           "region": "RegionOne",
                           "internalURL": "http://192.168.56.2:5000/v2.0",
                           "id": "19885c4b7ed7403eb6bec641b7105443",
                           "publicURL": "http://192.168.56.2:5000/v2.0"
                       }
                   ],
                   "endpoints_links":
                   [
                   ],
                   "type": "identity",
                   "name": "keystone"
               }
           ],
           "user":
           {
               "username": "demo",
               "roles_links":
               [
               ],
               "id": "f8b9c7807d95484fa829cdb68b410e77",
               "roles":
               [
                   {
                       "name": "_member_"
                   },
                   {
                       "name": "Member"
                   },
                   {
                       "name": "anotherrole"
                   }
               ],
               "name": "demo"
           },
           "metadata":
           {
               "is_admin": 0,
               "roles":
               [
                   "9fe2ff9ee4384b1894a90878d3e92bab",
                   "1fa59496fd6b4b07b4ce23a5ee8a3a0b",
                   "89764090d30949acaf9da2f9e0887ec6"
               ]
           }
       }
    }
除此之外,我们在body体中可以使用步骤1中的临时Token,来获取指定租户(demo)的token
POST  http://192.168.56.2:5000/v2.0/tokens
 {
   "auth":{
      "tenantName":"demo",
      "token":{
         "id":"a19bc13b46ba459cb3104fa97e414a27"
      }
   }
}
4.调用目标服务
有了指定租户的Token,我们就可以调用该租户提供的服务,比如demo租户提供类glance服务,那么我们怎么访问租户提供的服务呢?细心的读者可能在步骤3中已经发现,响应中提供每种服务都有的endpoint,这样endpoint是响应服务的REST API前缀。
如glance的endpoint为:http://192.168.56.2:9292
而其REST API为:http://192.168.56.2:9292 + api_uri
例如:http://192.168.56.2:9292/v2/images/{image_id}
我们通过调用服务的REST API调用目标服务,当请求到达响应服务之前,会先通过keystone验证用户的Token是否有效(如Token是否过期,Token对应的用户是否存在),验证通过后,服务进行后续操作。(注意:图中示例了当Token使用UUID的情况,目前大多数情况下PKI)
5.验证用户是否有权限执行操作
我们指定用户在某一租户中有响应的角色,这些角色决定了用户在该租户中的操作权限,默认情况下有admin和非admin两种角色,当然我们也可以添加角色,若自定义添加角色,则要在相应服务中的policy.json文件中定义相应角色的所能执行的操作。OpenStack的每个组件都有policy.json文件,其基于该文件实现基于角色的访问控制,当经过policy的检测,用户有权执行某一操作,相应服务才会对请求做进一步的处理。
6.服务执行用户请求
这一步由服务来完成用户请求,如图中所示创建虚拟机
7.给用户响应
将用户的请求结果呈现给用户,注意立即呈现的响应结果不一定是最终的响应结果,如创建虚拟机时,首先返回给用户的是虚拟机正在building
Token详解
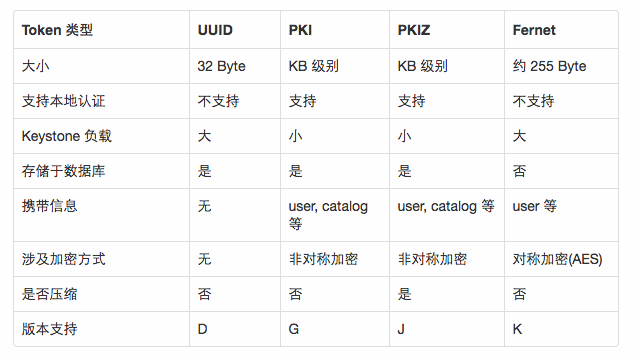
四种 Token 的由来
D 版本时,仅有 UUID 类型的 Token,UUID token 简单易用,却容易给 Keystone 带来性能问题,从图一的步骤 4 可看出,每当 OpenStack API 收到用户请求,都需要向 Keystone 验证该 token 是否有效。随着集群规模的扩大,Keystone 需处理大量验证 token 的请求,在高并发下容易出现性能问题。
于是 PKI( Public Key Infrastructrue ) token 在 G 版本运用而生,和 UUID 相比,PKI token 携带更多用户信息的同时还附上了数字签名,以支持本地认证,从而避免了步骤 4。因为 PKI token 携带了更多的信息,这些信息就包括 service catalog,随着 OpenStack 的 Region 数增多,service catalog 携带的 endpoint 数量越多,PKI token 也相应增大,很容易超出 HTTP Server 允许的最大 HTTP Header(默认为 8 KB),导致 HTTP 请求失败。
顾名思义, PKIZ token 就是 PKI token 的压缩版,但压缩效果有限,无法良好的处理 token size 过大问题。
前三种 token 都会持久性存于数据库,与日俱增积累的大量 token 引起数据库性能下降,所以用户需经常清理数据库的 token。为了避免该问题,社区提出了 Fernet token,它携带了少量的用户信息,大小约为 255 Byte,采用了对称加密,无需存于数据库中。
UUID
UUID token 是长度固定为 32 Byte 的随机字符串,由 uuid.uuid4().hex 生成。
1
2
def _get_token_id(self, token_data):
    return uuid.uuid4().hex
但是因 UUID token 不携带其它信息,OpenStack API 收到该 token 后,既不能判断该 token 是否有效,更无法得知该 token 携带的用户信息,所以需经图一步骤 4 向 Keystone 校验 token,并获用户相关的信息。其样例如下:
1
144d8a99a42447379ac37f78bf0ef608
UUID token 简单美观,不携带其它信息,因此 Keystone 必须实现 token 的存储和认证,随着集群的规模增大,Keystone 将成为性能瓶颈。
PKI
在阐述 PKI(Public Key Infrastruction) token 前,让我们简单的回顾 公开密钥加密(public-key cryptography) 和 数字签名 。公开密钥加密,也称为非对称加密(asymmetric cryptography,加密密钥和解密密钥不相同),在这种密码学方法中,需要一对密钥,分别为公钥(Public Key)和私钥(Private Key),公钥是公开的,私钥是非公开的,需用户妥善保管。如果把加密和解密的流程当做函数 C(x) 和 D(x),P 和 S 分别代表公钥和私钥,对明文 A 和密文 B 而言,数学的角度上有以下公式:
1
B = C(A, S)A = D(B, P)
其中加密函数 C(x), 解密函数 D(x) 以及公钥 P 均是公开的。采用公钥加密的密文只能用私钥解密,采用私钥加密的密文只能用公钥解密。非对称加密广泛运用在安全领域,诸如常见的 HTTPS,SSH 登录等。
数字签名又称为公钥数字签名,首先采用 Hash 函数对消息生成摘要,摘要经私钥加密后称为数字签名。接收方用公钥解密该数字签名,并与接收消息生成的摘要做对比,如果二者一致,便可以确认该消息的完整性和真实性。
PKI 的本质就是基于数字签名,Keystone 用私钥对 token 进行数字签名,各个 API server 用公钥在本地验证该 token。相关代码简化如下:
1
2
3
4
5
6
7
def _get_token_id(self, token_data):
    try:
        token_json = jsonutils.dumps(token_data, cls=utils.PKIEncoder)
        token_id = str(cms.cms_sign_token(token_json,
                                          CONF.signing.certfile,
                                          CONF.signing.keyfile))
        return token_id
其中 cms.cms_sign_token 调用 openssl cms –sign 对 token_data 进行签名,token_data 的样式如下:
1
2
3
4
5
6
7
8
9
10
11
12
13
14
15
16
17
18
19
20
21
22
23
24
25
26
27
28
{
  "token": {
    "methods": [ "password" ],
    "roles": [{"id": "5642056d336b4c2a894882425ce22a86", "name": "admin"}],
    "expires_at": "2015-12-25T09:57:28.404275Z",
    "project": {
      "domain": { "id": "default", "name": "Default"},
      "id": "144d8a99a42447379ac37f78bf0ef608", "name": "admin"},
    "catalog": [
      {
        "endpoints": [
          {
            "region_id": "RegionOne",
            "url": "http://controller:5000/v2.0",
            "region": "RegionOne",
            "interface": "public",
            "id": "3837de623efd4af799e050d4d8d1f307"
          },
          ......
      ]}],
    "extras": {},
    "user": {
      "domain": {"id": "default", "name": "Default"},
      "id": "1552d60a042e4a2caa07ea7ae6aa2f09", "name": "admin"},
    "audit_ids": ["ZCvZW2TtTgiaAsVA8qmc3A"],
    "issued_at": "2015-12-25T08:57:28.404304Z"
  }
}
token_data 经 cms.cms_sign_token 签名生成的 token_id 如下,共 1932 Byte:
1
2
3
MIIKoZIhvcNAQcCoIIFljCCBZICAQExDTALBglghkgBZQMEAgEwggPzBgkqhkiG9w0B
......
rhr0acV3bMKzmqvViHf-fPVnLDMJajOWSuhimqfLZHRdr+ck0WVQosB6+M6iAvrEF7v
PKIZ
PKIZ 在 PKI 的基础上做了压缩处理,但是压缩的效果极其有限,一般情况下,压缩后的大小为 PKI token 的 90 % 左右,所以 PKIZ 不能友好的解决 token size 太大问题。
1
2
3
4
5
6
7
def _get_token_id(self, token_data):
    try:
        token_json = jsonutils.dumps(token_data, cls=utils.PKIEncoder)
        token_id = str(cms.pkiz_sign(token_json,
                                     CONF.signing.certfile,
                                     CONF.signing.keyfile))
        return token_id
其中 cms.pkiz_sign() 中的以下代码调用 zlib 对签名后的消息进行压缩级别为 6 的压缩。
compressed = zlib.compress(token_id, compression_level=6) PKIZ token 样例如下,共 1645 Byte,比 PKI token 减小 14.86 %:
1
2
3
PKIZ_eJytVcuOozgU3fMVs49aTXhUN0vAQEHFJiRg8IVHgn5OnA149JVaunNS3NYjoSU
......
W4fRaxrbNtinojheVICXYrEk0oPX6TSnP71IYj2e3nm4MLy7S84PtIPDz4_03IsOb2Q=
Fernet
用户可能会碰上这么一个问题,当集群运行较长一段时间后,访问其 API 会变得奇慢无比,究其原因在于 Keystone 数据库存储了大量的 token 导致性能太差,解决的办法是经常清理 token。为了避免上述问题,社区提出了 Fernet token ,它采用 cryptography 对称加密库(symmetric cryptography,加密密钥和解密密钥相同) 加密 token,具体由 AES-CBC 加密和散列函数 SHA256 签名。 Fernet 是专为 API token 设计的一种轻量级安全消息格式,不需要存储于数据库,减少了磁盘的 IO,带来了一定的 性能提升 。为了提高安全性,需要采用 Key Rotation 更换密钥。
1
2
3
4
5
6
7
8
9
10
11
12
13
14
15
16
17
18
19
20
21
22
def create_token(self, user_id, expires_at, audit_ids, methods=None,
                 domain_id=None, project_id=None, trust_id=None,
                 federated_info=None):
    """Given a set of payload attributes, generate a Fernet token."""

    if trust_id:
        version = TrustScopedPayload.version
        payload = TrustScopedPayload.assemble(
            user_id,
            methods,
            project_id,
            expires_at,
            audit_ids,
            trust_id)

    ...

    versioned_payload = (version,) + payload
    serialized_payload = msgpack.packb(versioned_payload)
    token = self.pack(serialized_payload)

    return token
以上代码表明,token 包含了 user_id,project_id,domain_id,methods,expires_at 等信息,重要的是,它没有 service_catalog,所以 region 的数量并不影响它的大小。self.pack() 最终调用如下代码对上述信息加密:
1
2
3
4
5
6
7
8
def crypto(self):
    keys = utils.load_keys()

    if not keys:
        raise exception.KeysNotFound()

    fernet_instances = [fernet.Fernet(key) for key in utils.load_keys()]
    return fernet.MultiFernet(fernet_instances)
该 token 的大小一般在 200 多 Byte 左右,本例样式如下,大小为 186 Byte:
1
2
3
gAAAAABWfX8riU57aj0tkWdoIL6UdbViV-632pv0rw4zk9igCZXgC-sKwhVuVb-wyMVC9e5TFc
7uPfKwNlT6cnzLalb3Hj0K3bc1X9ZXhde9C2ghsSfVuudMhfR8rThNBnh55RzOB8YTyBnl9MoQ
XBO5UIFvC7wLTh_2klihb6hKuUqB6Sj3i_8
如何选择 Token
Token 类型的选择涉及多个因素,包括 Keystone server 的负载、region 数量、安全因素、维护成本以及 token 本身的成熟度。region 的数量影响 PKI/PKIZ token 的大小,从安全的角度上看,UUID 无需维护密钥,PKI 需要妥善保管 Keystone server 上的私钥,Fernet 需要周期性的更换密钥,因此从安全、维护成本和成熟度上看,UUID > PKI/PKIZ > Fernet 如果:
- Keystone server 负载低,region 少于 3 个,采用 UUID token。
- Keystone server 负载高,region 少于 3 个,采用 PKI/PKIZ token。
- Keystone server 负载低,region 大与或等于 3 个,采用 UUID token。
- Keystone server 负载高,region 大于或等于 3 个,K 版本及以上可考虑采用 Fernet token。
keystone性能优化
openstack采用了token认证的机制,各api的调用都会涉及到token的验证问题,使得keystone成为一个性能的瓶颈。
token的验证环节包括:验证请求中包含的token是否有效、过期,该token对应的用户组和用户id,对应的授权服务访问地址等。
性能瓶颈的解决-1:
由于openstack中的各api都是wsgi服务,并且都用到了keystoneclient提供的一个中间件(wsgi filter)auth_token,对应的文件位于:keystoneclient/middleware/auth_token.py。该中间件采用memcache来缓存token的相关信息到本地,从而减少各服务对keystone的直接访问,不过默认情况下缓存并未启用。为此,添加如下配置到nova.conf、cinder.conf…
1
2
3
4
5
6
7
8
9
10
11
[keystone_authtoken]
auth_uri = http://keystone_server:5000/
auth_host = keystone_server
auth_port = 35357
auth_protocol = http
admin_tenant_name = service
admin_user = nova
admin_password = password
memcache_servers = 127.0.0.1:11211
token_cache_time = 3600 #token本地缓存的失效时间设置为1个小时。
cache = true
auth_token中间件中,token认证的相关代码片段如下:
1
2
3
4
5
6
7
8
9
10
11
12
13
14
15
16
17
try:
    token_id = cms.cms_hash_token(user_token)
    cached = self._cache_get(token_id)
    if cached:
        return cached
        if cms.is_ans1_token(user_token):
            verified = self.verify_signed_token(user_token)
            data = json.loads(verified)
        else:
            data = self.verify_uuid_token(user_token, retry)
            self._cache_put(token_id, data)
            return data
        except Exception as e:
            self.LOG.debug(‘Token validation failure.’, exc_info=True)
            self._cache_store_invalid(user_token)
            self.LOG.warn(“Authorization failed for token %s”, user_token)
            raise InvalidUserToken(‘Token authorization failed’)
性能瓶颈的解决-2:keystone并行化
当前的keystone实现中并没有采用并行化的机制,keystone-all运行时分别发起两个进程、绑定到两个socket上,分别处理5000和35357端口上的请求。
1
2
3
4
5
6
7
8
9
10
11
12
13
14
#管理端口请求的处理
servers.append(create_server(CONF.config_file[0],
                            ‘admin’,
                             CONF.bind_host,
                             int(CONF.admin_port)))
#业务端口请求的处理
servers.append(create_server(CONF.config_file[0],
                            ‘main’,
                             CONF.bind_host,
                             int(CONF.public_port)))
def serve(*servers):
    signal.signal(signal.SIGINT, sigint_handler)
    for server in servers:
        server.start()
大概的修改如下:
-
引入了多线程下共享的socket
-
根据配置选项works的大小,发起多个进程处理api的请求
代码修改之后,还需对keystone的配置做适当更新: keystone默认的token存储后端为基于内存的k-v,范围在一个进程的空间内。并行化之后,多个进程需共享访问token的存储后端,这里采用memcache。修改keystone.conf,并安装memcache服务。
1
2
[token]
# driver = keystone.token.backends.memcache.Token